Sugar Cookie Cheesecake Recipe
Introduction
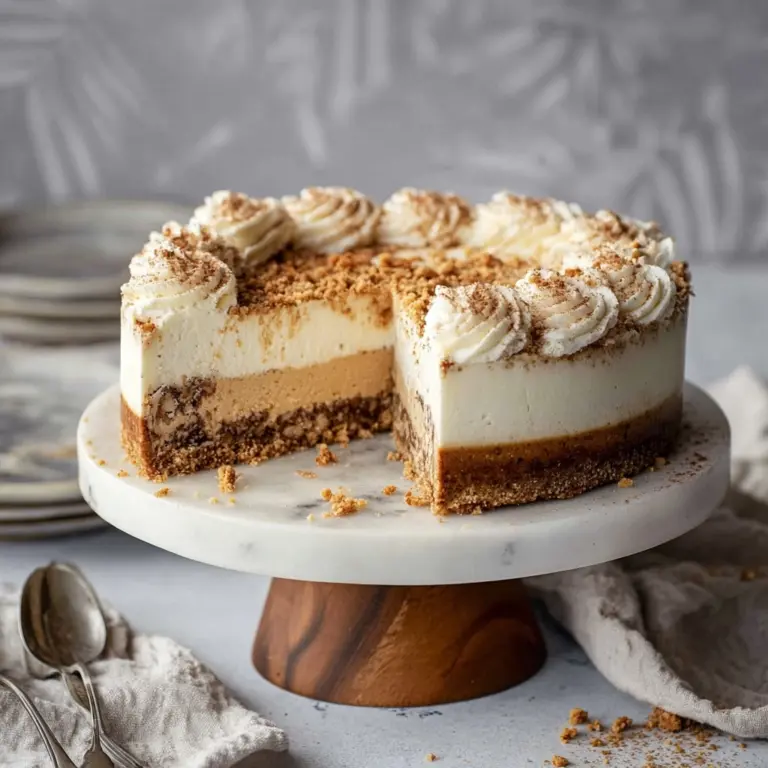
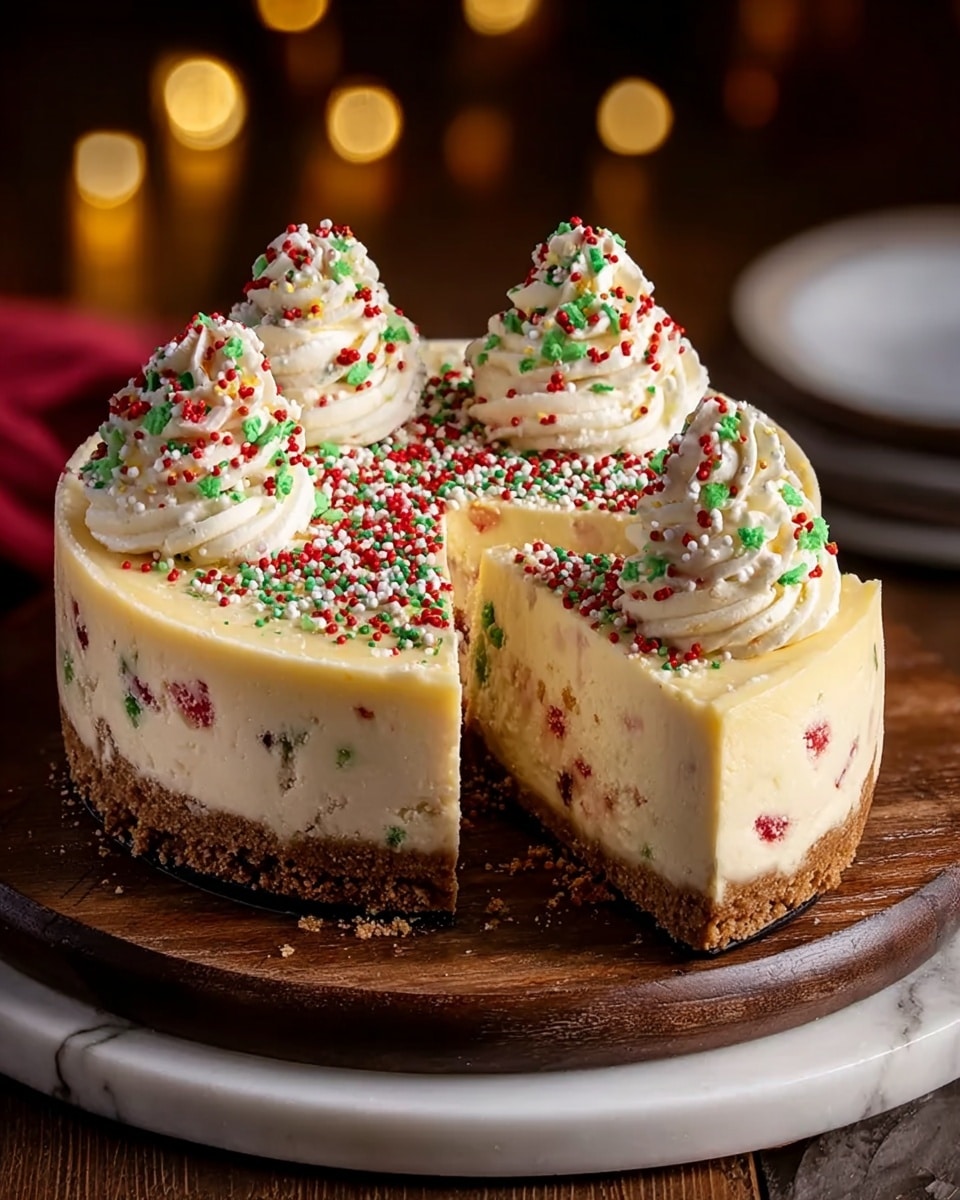
This Sugar Cookie Cheesecake combines a buttery sugar cookie crust with a smooth, creamy cheesecake filling, making it a delightful dessert for any occasion. Topped with whipped cream and fresh berries, it’s both festive and comforting.
Ingredients
- 1 1/2 cups all-purpose flour
- 1/2 cup unsalted butter, softened
- 1/4 cup granulated sugar
- 1 egg
- 1 teaspoon vanilla extract
- 1/2 teaspoon baking powder
- 1/4 teaspoon salt
- 2 (8 oz) packages cream cheese, softened
- 1 cup granulated sugar
- 1 teaspoon vanilla extract
- 2 large eggs
- 1/4 cup sour cream (optional)
- 1 tablespoon all-purpose flour
- Whipped cream (optional)
- Sugar sprinkles (optional)
- Fresh berries (optional)
Instructions
- Step 1: Preheat your oven to 350°F (175°C). In a bowl, cream together the softened butter and 1/4 cup sugar until fluffy. Beat in the egg and 1 teaspoon vanilla extract.
- Step 2: In another bowl, whisk together 1 1/2 cups flour, baking powder, and salt. Gradually combine the dry ingredients with the wet mixture to form a dough.
- Step 3: Press the dough evenly into the bottom of a 9-inch springform pan. Bake the crust for 10 to 12 minutes, then remove and let cool slightly.
- Step 4: Lower the oven temperature to 325°F (163°C). In a large bowl, beat the softened cream cheese until smooth. Add 1 cup sugar and 1 teaspoon vanilla extract, mixing well.
- Step 5: Beat in the eggs one at a time, ensuring each is fully incorporated before adding the next. Then mix in the sour cream and 1 tablespoon flour until the filling is smooth and creamy.
- Step 6: Pour the cheesecake filling over the prepared crust, smoothing the top with a spatula. Tap the pan gently on the counter to release any trapped air bubbles.
- Step 7: Bake for 40 to 50 minutes. The cheesecake should be set around the edges but slightly jiggly in the center. Cover the edges with foil if they begin to brown too much.
- Step 8: Let the cheesecake cool at room temperature for 30 minutes, then refrigerate for at least 3 to 4 hours or overnight to fully set.
- Step 9: Remove the cheesecake from the pan and garnish with whipped cream, sugar sprinkles, and fresh berries if desired before serving.
Tips & Variations
- For a richer crust flavor, add a pinch of cinnamon or nutmeg to the cookie dough.
- Use full-fat cream cheese and sour cream for the creamiest texture.
- Add lemon zest to the filling for a bright, citrusy twist.
- Swap fresh berries for a homemade fruit compote to customize flavors.
Storage
Store the cheesecake covered in the refrigerator for up to 4 days. To reheat, allow slices to come to room temperature for about 15 minutes; avoid microwaving to keep texture intact. For longer storage, you can freeze the cheesecake wrapped tightly for up to 1 month, thawing overnight in the fridge before serving.
How to Serve
Serve this delicious recipe with your favorite sides.
FAQs
Can I use a different crust instead of sugar cookie crust?
Yes, a graham cracker crust or a traditional shortbread crust can be used if you prefer a different base. Each will give the cheesecake a unique texture and flavor.
Why is my cheesecake cracking?
Cracks often form if the cheesecake bakes too quickly or is overbaked. Baking at a lower temperature and avoiding sudden temperature changes by cooling slowly can help prevent cracks.
PrintSugar Cookie Cheesecake Recipe

This Sugar Cookie Cheesecake combines the buttery, sweet flavor of sugar cookies with a smooth and creamy classic cheesecake filling. A delicious dessert that starts with a homemade sugar cookie crust, topped with a rich cream cheese filling, and finished with optional whipped cream and fresh berries for a delightful treat perfect for any occasion.
- Prep Time: 20 minutes
- Cook Time: 50 minutes
- Total Time: 4 hours 20 minutes
- Yield: 8 servings 1x
- Category: Dessert
- Method: Baking
- Cuisine: American
Ingredients
For the Sugar Cookie Crust:
- 1 1/2 cups all-purpose flour
- 1/2 cup unsalted butter, softened
- 1/4 cup granulated sugar
- 1 egg
- 1 teaspoon vanilla extract
- 1/2 teaspoon baking powder
- 1/4 teaspoon salt
For the Cheesecake Filling:
- 2 (8 oz) packages cream cheese, softened
- 1 cup granulated sugar
- 1 teaspoon vanilla extract
- 2 large eggs
- 1/4 cup sour cream (optional)
- 1 tablespoon all-purpose flour
For the Topping (optional):
- Whipped cream
- Sugar sprinkles
- Fresh berries
Instructions
- Make the Sugar Cookie Crust: Preheat your oven to 350°F (175°C). In a mixing bowl, cream the softened butter and sugar together until the mixture is light and fluffy. Beat in the egg and vanilla extract until well combined. In another bowl, whisk together the flour, baking powder, and salt. Gradually combine the dry ingredients with the wet mixture to form a dough. Press this dough evenly into the bottom of a 9-inch springform pan. Bake the crust for 10 to 12 minutes until lightly golden, then remove and allow it to cool slightly.
- Prepare the Cheesecake Filling: In a large bowl, beat the cream cheese until smooth and creamy. Add the sugar and vanilla extract, mixing well to combine. Incorporate the eggs one at a time, beating well after each addition. Add the sour cream and flour and beat the mixture until it is smooth and creamy.
- Assemble the Cheesecake: Pour the prepared cheesecake filling over the cooled sugar cookie crust, smoothing the top with a spatula. Gently tap the pan on the countertop a few times to release any trapped air bubbles in the filling.
- Bake the Cheesecake: Reduce the oven temperature to 325°F (163°C). Bake the cheesecake for 40 to 50 minutes, or until the edges are set and the center is slightly jiggly when gently shaken. If the edges start to brown too quickly, cover them loosely with foil to prevent over-browning.
- Cool the Cheesecake: Remove the cheesecake from the oven and allow it to cool at room temperature for about 30 minutes. Then refrigerate it for at least 3 to 4 hours or overnight to fully set.
- Serve: Once chilled, remove the cheesecake from the springform pan. Optionally, garnish with whipped cream, sugar sprinkles, and fresh berries before serving for a festive and flavorful presentation.
Notes
- For best results, ensure the cream cheese is softened to room temperature to avoid lumps in the cheesecake filling.
- You can substitute sour cream with Greek yogurt if preferred for a slight tang.
- To avoid cracks, do not overmix the batter and avoid opening the oven door frequently during baking.
- Use a springform pan for easy removal of the cheesecake.
- Allow the cheesecake to chill thoroughly; this helps it firm up and enhances the texture.
- Feel free to customize toppings with your favorite fruits or dessert sauces.
Keywords: sugar cookie cheesecake, cheesecake recipe, sugar cookie crust, creamy cheesecake, easy dessert