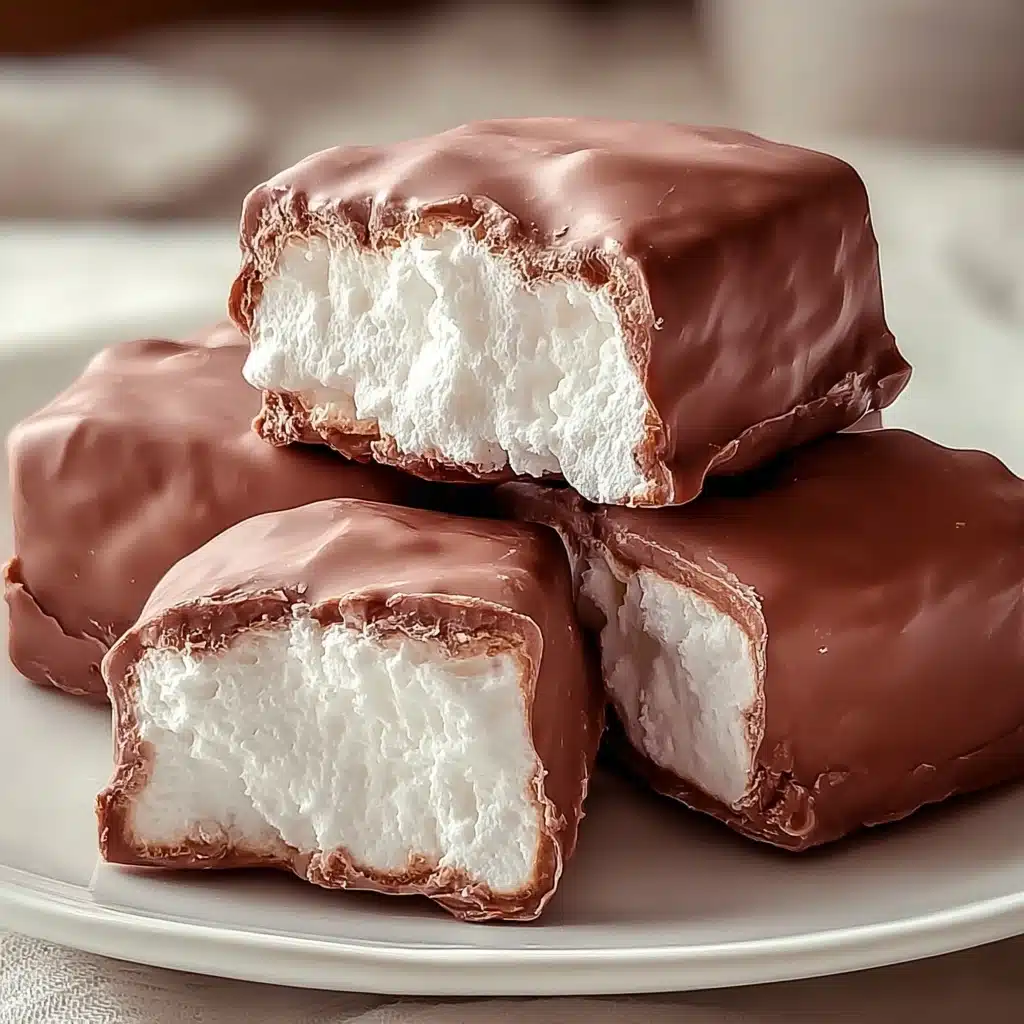
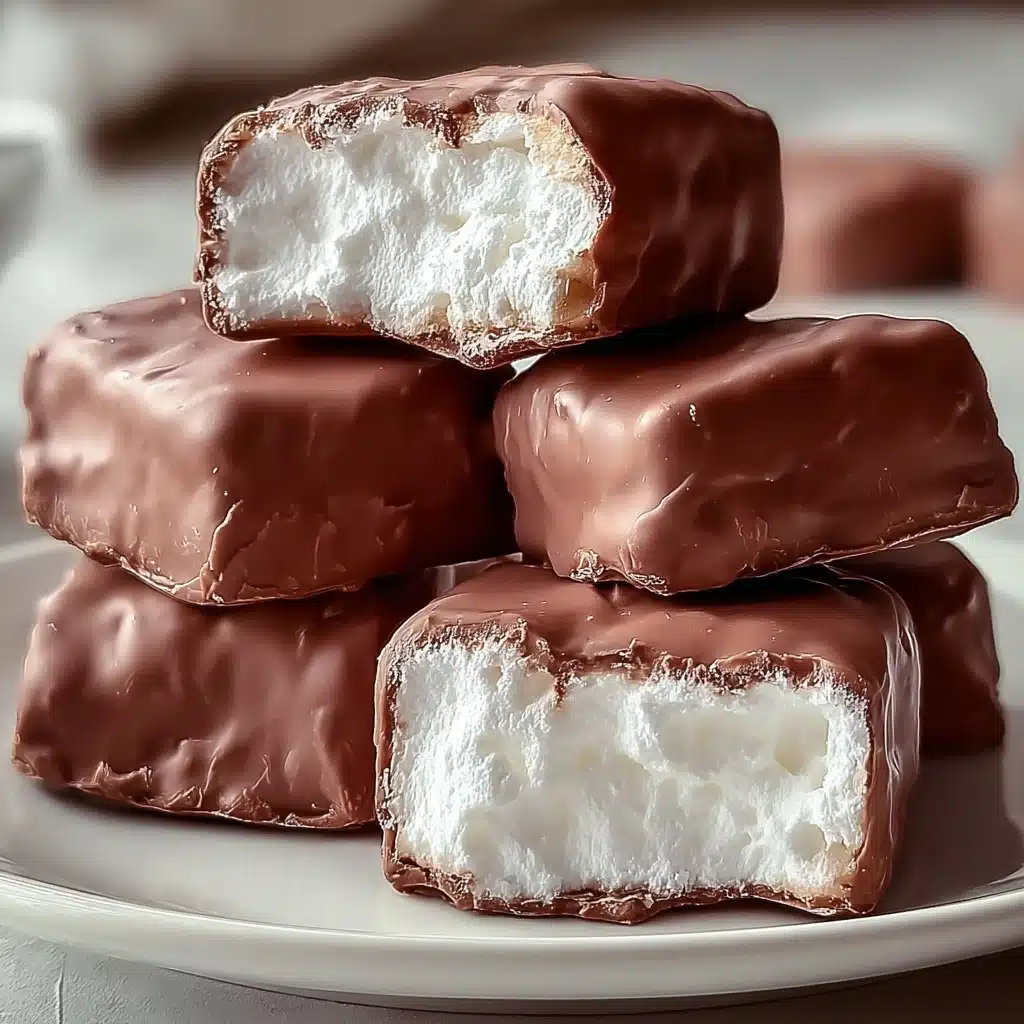
Seriously Easy 3-Ingredient No-Bake Cool Whip Candy Recipe
If you’re on the hunt for a quick and delightful treat that requires barely any effort but delivers maximum joy, you’ve just hit the jackpot with this Seriously Easy 3-Ingredient No-Bake Cool Whip Candy. It’s creamy, sweet, and bursting with fun little surprises from your chosen mix-ins. Whether you want something to whip up for unexpected guests or a festive party snack, this candy checks all the boxes without demanding hours in the kitchen. Trust me, this delightful concoction is about to become your new go-to for easy, no-fuss sweets that everyone will love.
Ingredients You’ll Need
This recipe shines because it relies on just a few simple ingredients, each meticulously chosen to create that perfect fluffy, creamy texture and playful burst of flavor and color. These essentials come together to form the base and the fun mix-ins that make this Seriously Easy 3-Ingredient No-Bake Cool Whip Candy truly special.
- Marshmallow Fluff: This adds sweetness and the classic marshmallow chewiness that’s essential for candy texture.
- Cool Whip or frozen whipped topping, thawed: Brings lightness and creaminess, making the candy airy and smooth.
- Crushed candies: Choose crushed peppermint, mini chocolate chips, M&Ms, sprinkles, or crushed shortbread cookies for an individualized burst of flavor and fun texture.
How to Make Seriously Easy 3-Ingredient No-Bake Cool Whip Candy
Step 1: Prepare Your Mixing Space
Start by grabbing a nice big mixing bowl—having enough room to fold and blend is key for even mixing and easy handling. It’s all about setting yourself up for a smooth cooking experience.
Step 2: Combine Marshmallow Fluff and Cool Whip
Pour the whole container of marshmallow fluff and the thawed Cool Whip into your bowl. This is the creamy foundation for your candy, providing the structure and sweet base flavor you want.
Step 3: Gently Blend Until Smooth
Using a spatula, fold and stir the mixture gently until it becomes super smooth and perfectly combined. If you want, a hand mixer on the lowest speed can assist, but remember to be gentle—overmixing can affect the airy texture you’re aiming for.
Step 4: Fold in Your Chosen Crushed Candies
Now, sprinkle in your crushed candies and fold them in carefully with your spatula. The goal is to spread those tasty bits evenly without breaking the fluffy mixture down.
Step 5: Transfer to Pan or Molds
Line a small tray or an 8×8 pan with parchment paper or use silicone molds. Pour your mixture in and spread it evenly for uniform candy pieces. If you prefer balls, you can skip to shaping after chilling.
Step 6: Chill Until Firm
Cover and refrigerate for at least one hour, or speed things up by chilling in the freezer for 20-30 minutes. This step is crucial—it lets your candy set to that perfect, sliceable or scoopable consistency.
Step 7: Shape and Cut Your Candy
Once your candy is firm, lift it out of the pan using the parchment paper and cut into bite-sized squares or rectangles. For energy balls, simply roll the chilled mixture into one-inch spheres with clean hands or a cookie scoop.
Step 8: Arrange and Serve
Place your finished candies on a serving platter. Keep them chilled until serving to maintain that cool, satisfying texture everyone loves.
How to Serve Seriously Easy 3-Ingredient No-Bake Cool Whip Candy
Garnishes
Add a festive touch by sprinkling a bit of extra crushed candy or drizzle some melted chocolate over the top just before serving. It’s a simple way to enhance both presentation and flavor.
Side Dishes
This candy pairs wonderfully with a cup of hot cocoa, a refreshing glass of milk, or even alongside coffee for a sweet little break. Its cool, fluffy texture contrasts so well with warm beverages.
Creative Ways to Present
Try arranging your candies in colorful mini cupcake liners or on a tiered dessert stand for parties. You can even wrap individual pieces in wax paper tied with a ribbon for charming homemade gifts. The Seriously Easy 3-Ingredient No-Bake Cool Whip Candy looks as delightful as it tastes!
Make Ahead and Storage
Storing Leftovers
Keep any leftover candy in an airtight container in the refrigerator. It stays fresh and maintains its texture beautifully for up to a week, making it great for preparing in advance.
Freezing
You can freeze this candy too! Wrap pieces individually in plastic wrap and place them in a freezer-safe container. When you’re ready, just thaw in the fridge overnight to enjoy that fresh-from-the-fridge feel.
Reheating
Since this is a no-bake, cool treat, reheating isn’t needed and could ruin the texture. It’s best served chilled straight from the fridge or after a brief thaw if frozen.
FAQs
Can I use regular whipped cream instead of Cool Whip?
While regular whipped cream can be a substitute, it tends to be less stable and may not hold the candy’s shape as well compared to Cool Whip’s thicker texture.
What kind of candies work best as mix-ins?
Almost anything crunchy or colorful works great—think peppermint, mini chocolate chips, crushed cookies, or even sprinkles. Choose your favorite flavor and texture to personalize your candy.
How long does this candy last in the fridge?
Stored properly in an airtight container, the candy stays fresh and delicious for about one week in the refrigerator.
Is this recipe kid-friendly?
Absolutely! Kids love the sweet flavors and fun mix-ins, and it’s a joy to make together since it doesn’t require any baking or hot ingredients.
Can I make this candy dairy-free?
To make it dairy-free, look for dairy-free marshmallow fluff and whipped topping alternatives. These substitutions can work well while keeping the recipe’s spirit intact.
Final Thoughts
This Seriously Easy 3-Ingredient No-Bake Cool Whip Candy is truly a gem for anyone who loves quick, delicious desserts without the fuss. It’s creamy, customizable, and perfect for any occasion where you want to impress without stress. Give this recipe a try—you might just find your new favorite sweet treat to share with friends and family!
PrintSeriously Easy 3-Ingredient No-Bake Cool Whip Candy Recipe

A delightfully easy and quick no-bake candy made with just three main ingredients: marshmallow fluff, Cool Whip, and your favorite crushed candies. Perfect for creating sweet, fluffy treats without turning on the oven.
- Prep Time: 10 minutes
- Cook Time: 0 minutes
- Total Time: 1 hour 10 minutes
- Yield: 24–30 small candies 1x
- Category: Candy, No-Bake Snack
- Method: No-Bake, Mixing, Chilling
- Cuisine: American
- Diet: Vegetarian
Ingredients
Candy Base
- 225 g Marshmallow Fluff (1 cup / 8 oz)
- 225 g Cool Whip or frozen whipped topping, thawed (1 cup / 8 oz)
Mix-ins
- 60 g Crushed candies (½ cup), such as peppermint, mini chocolate chips, M&Ms, sprinkles, or crushed shortbread cookies
Instructions
- Prepare Mixing Bowl: Grab a nice big mixing bowl to ensure you have plenty of room to combine ingredients without spills.
- Add Base Ingredients: Add the entire container of marshmallow fluff and the thawed Cool Whip to the bowl.
- Blend Smoothly: Gently fold these together with a spatula until the mixture is super smooth and completely combined. Optionally, use a hand mixer on the lowest setting briefly, but be careful not to overmix as that can deflate the fluff.
- Fold in Mix-ins: Gently fold your choice of crushed candies into the mixture using a spatula, distributing them evenly without beating to maintain fluffiness.
- Prepare Tray or Molds: Line a small tray (like an 8×8 pan) with parchment paper or use silicone molds. Pour the mixture in and spread it evenly. If making candy balls, you can shape now or after chilling.
- Chill the Candy: Cover with plastic wrap and refrigerate for at least 1 hour to achieve the right candy consistency. For quicker results, chill in the freezer for 20-30 minutes until firm enough to handle or slice.
- Cut or Shape: Once firm, lift the mixture out using the parchment paper and cut into squares or rectangles if using a tray. If making balls, roll the mixture into 1-inch balls using clean hands or a cookie scoop.
- Serve and Store: Arrange candies on a serving platter and keep them chilled in the refrigerator until ready to serve.
Notes
- Use any crushed candies or mix-ins according to your preference for customized flavors and textures.
- Do not overmix to maintain the fluffy texture of the candy base.
- Chilling time is crucial for firm candy consistency; do not skip or reduce significantly.
- If making balls, chilling partially before shaping can make rolling easier.
- Store leftover candies in an airtight container in the refrigerator for up to one week.
Nutrition
- Serving Size: 1 small candy (approx. 25 g)
- Calories: 90
- Sugar: 12 g
- Sodium: 20 mg
- Fat: 4.5 g
- Saturated Fat: 2.5 g
- Unsaturated Fat: 1.5 g
- Trans Fat: 0 g
- Carbohydrates: 13 g
- Fiber: 0.2 g
- Protein: 0.3 g
- Cholesterol: 5 mg
Keywords: no-bake candy, easy candy recipe, cool whip candy, marshmallow fluff treats, quick dessert, simple no-bake sweets, homemade candy