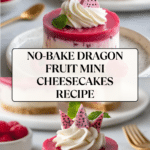
No-Bake Dragon Fruit Mini Cheesecakes Recipe
Introduction
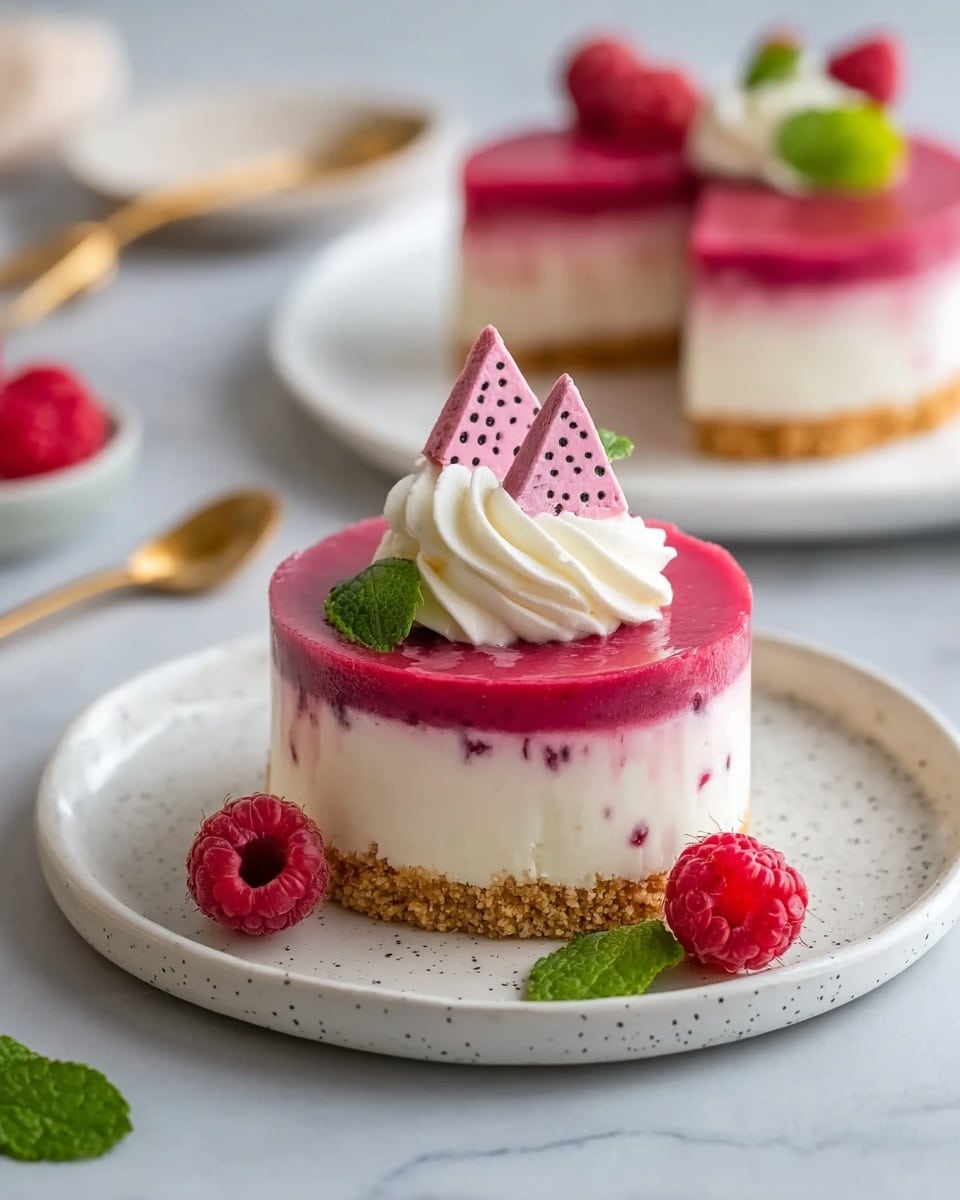
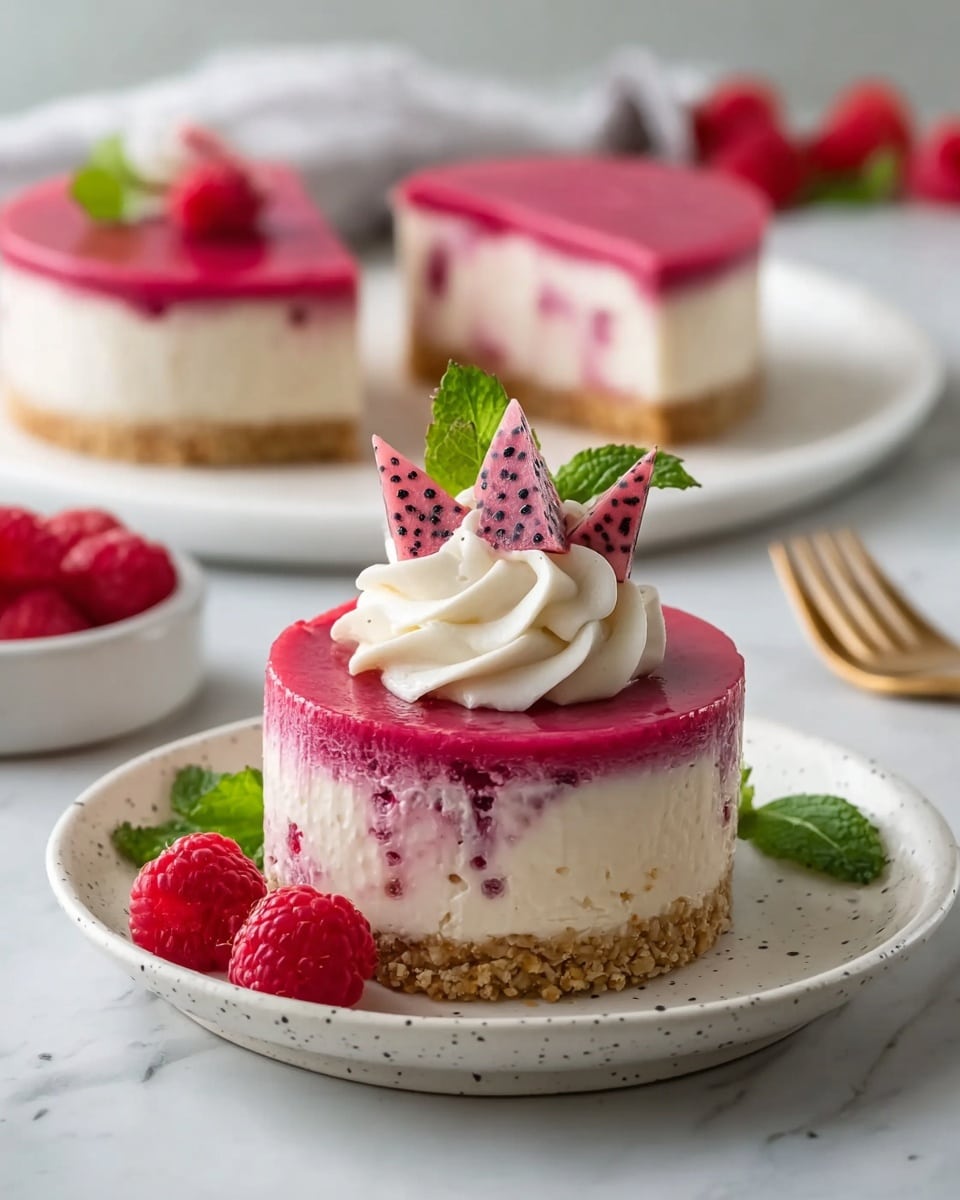
These No-Bake Dragon Fruit Mini Cheesecakes are a vibrant and refreshing dessert perfect for any occasion. With a creamy filling and a sweet, crunchy crust, they showcase exotic dragon fruit in a deliciously simple way. Plus, no oven needed—making them easy and fun to prepare.
Ingredients
- 1 ½ cups graham crackers, crushed
- 5 tbsp unsalted butter, melted
- 2 tbsp sugar
- 2 cups cream cheese, softened
- 1 cup heavy cream, chilled
- ¾ cup powdered sugar
- 1 tsp vanilla extract
- 1 tbsp lemon juice
- 1 large dragon fruit, pureed
- 2 tbsp powdered sugar (optional)
- 2 tsp gelatin or agar-agar
- 3 tbsp warm water
- Garnish options: fresh dragon fruit cubes, mint leaves, whipped cream
Instructions
- Step 1: Prepare the crust by combining crushed graham crackers, melted butter, and sugar in a bowl. Press the mixture firmly into the bottoms of muffin cups or a mini cheesecake pan. Chill in the refrigerator while you prepare the filling.
- Step 2: In a small bowl, sprinkle gelatin or agar-agar over the warm water and let it bloom for a few minutes. Gently warm if needed to dissolve fully.
- Step 3: Beat the cream cheese, powdered sugar, vanilla extract, and lemon juice until smooth and creamy.
- Step 4: Whip the heavy cream until stiff peaks form, then fold it gently into the cream cheese mixture to keep it light and airy.
- Step 5: Stir the pureed dragon fruit and dissolved gelatin mixture into the cheesecake filling. Add the optional powdered sugar here if you want a sweeter filling.
- Step 6: Spoon the filling evenly over the chilled crusts and smooth the tops with a spatula. Refrigerate for at least 4 hours or until fully set.
- Step 7: Before serving, garnish each mini cheesecake with fresh dragon fruit cubes, a few mint leaves, or a dollop of whipped cream for a beautiful finish.
Tips & Variations
- Use agar-agar as a vegan alternative to gelatin for setting the filling.
- Add a splash of lime juice to the dragon fruit puree for extra brightness.
- Swap graham cracker crust for crushed digestive biscuits or gluten-free cookies to suit dietary needs.
- For a different flavor profile, mix in some shredded coconut or white chocolate shavings into the filling.
Storage
Store the mini cheesecakes in an airtight container in the refrigerator for up to 3 days. To keep them fresh longer, cover each cheesecake individually with plastic wrap before placing in the container. For best texture, serve chilled. If needed, allow them to sit at room temperature for 10 minutes before serving to soften slightly.
How to Serve
Serve this delicious recipe with your favorite sides.
FAQs
Can I use frozen dragon fruit for this recipe?
Yes, frozen dragon fruit can be used. Thaw it completely and drain any excess liquid before pureeing to prevent the filling from becoming too watery.
How do I substitute gelatin for agar-agar?
To substitute agar-agar for gelatin, use the same amount by weight but be sure to dissolve it in boiling water as agar-agar needs higher temperatures to activate. The setting time might be faster, so chill accordingly.
PrintNo-Bake Dragon Fruit Mini Cheesecakes Recipe

These No-Bake Dragon Fruit Mini Cheesecakes are a vibrant and refreshing dessert featuring a crunchy graham cracker crust, a creamy cheesecake filling, and a naturally sweet dragon fruit layer. Perfect for warm days, these mini cheesecakes require no baking and can be assembled quickly with simple ingredients, then chilled to set. Garnished with fresh dragon fruit, mint leaves, and whipped cream, they make an elegant and colorful treat for any occasion.
- Prep Time: 20 minutes
- Cook Time: 0 minutes
- Total Time: 4 hours 20 minutes
- Yield: 12 mini cheesecakes 1x
- Category: Dessert
- Method: No-Cook
- Cuisine: Fusion
Ingredients
For the crust:
- 1 ½ cups graham crackers, crushed
- 5 tbsp unsalted butter, melted
- 2 tbsp sugar
For the cheesecake filling:
- 2 cups cream cheese, softened
- 1 cup heavy cream, chilled
- ¾ cup powdered sugar
- 1 tsp vanilla extract
- 1 tbsp lemon juice
For the dragon fruit layer:
- 1 large dragon fruit, pureed
- 2 tbsp powdered sugar (optional)
- 2 tsp gelatin or agar-agar
- 3 tbsp warm water
For garnish (optional):
- Fresh dragon fruit cubes
- Mint leaves
- Whipped cream
Instructions
- Prepare the crust: In a bowl, mix the crushed graham crackers, melted butter, and sugar until combined. Press this mixture evenly into the bottom of muffin cups to form the crust. Place the muffin pan in the refrigerator to chill and firm up while you prepare the filling.
- Make the filling: In a large mixing bowl, beat the softened cream cheese with powdered sugar and vanilla extract until smooth and creamy. In a separate bowl, whip the chilled heavy cream until stiff peaks form. Gently fold the whipped cream into the cream cheese mixture, then stir in the lemon juice for brightness.
- Prepare the dragon fruit layer: Puree the dragon fruit in a blender or food processor until smooth. If desired, stir in powdered sugar to sweeten. Dissolve the gelatin or agar-agar in warm water according to package directions, then mix it thoroughly into the dragon fruit puree.
- Assemble the cheesecakes: Spoon a layer of the cream cheese filling over the chilled crusts in the muffin cups. Then carefully spoon or layer the dragon fruit mixture on top, smoothing the surface with the back of a spoon. Return the assembled cheesecakes to the refrigerator and chill for at least 4 hours or until set.
- Garnish and serve: Once the mini cheesecakes have set, remove them from the muffin cups and garnish each with fresh dragon fruit cubes, mint leaves, and a dollop of whipped cream if desired. Serve chilled and enjoy a colorful, refreshing dessert.
Notes
- For a firmer dragon fruit layer, use gelatin instead of agar-agar as gelatin sets more firmly.
- If you prefer a sweeter dessert, increase the powdered sugar in the filling or dragon fruit layer slightly.
- You can substitute graham crackers with digestive biscuits for a different crust flavor.
- Ensure the cream cheese is softened to room temperature to avoid lumps in the filling.
- These mini cheesecakes can be stored in the refrigerator for up to 3 days.
- For a vegan version, use plant-based cream cheese, coconut cream, and agar-agar instead of gelatin.
Keywords: no-bake cheesecake, dragon fruit dessert, mini cheesecakes, easy summer dessert, no-bake mini cheesecakes