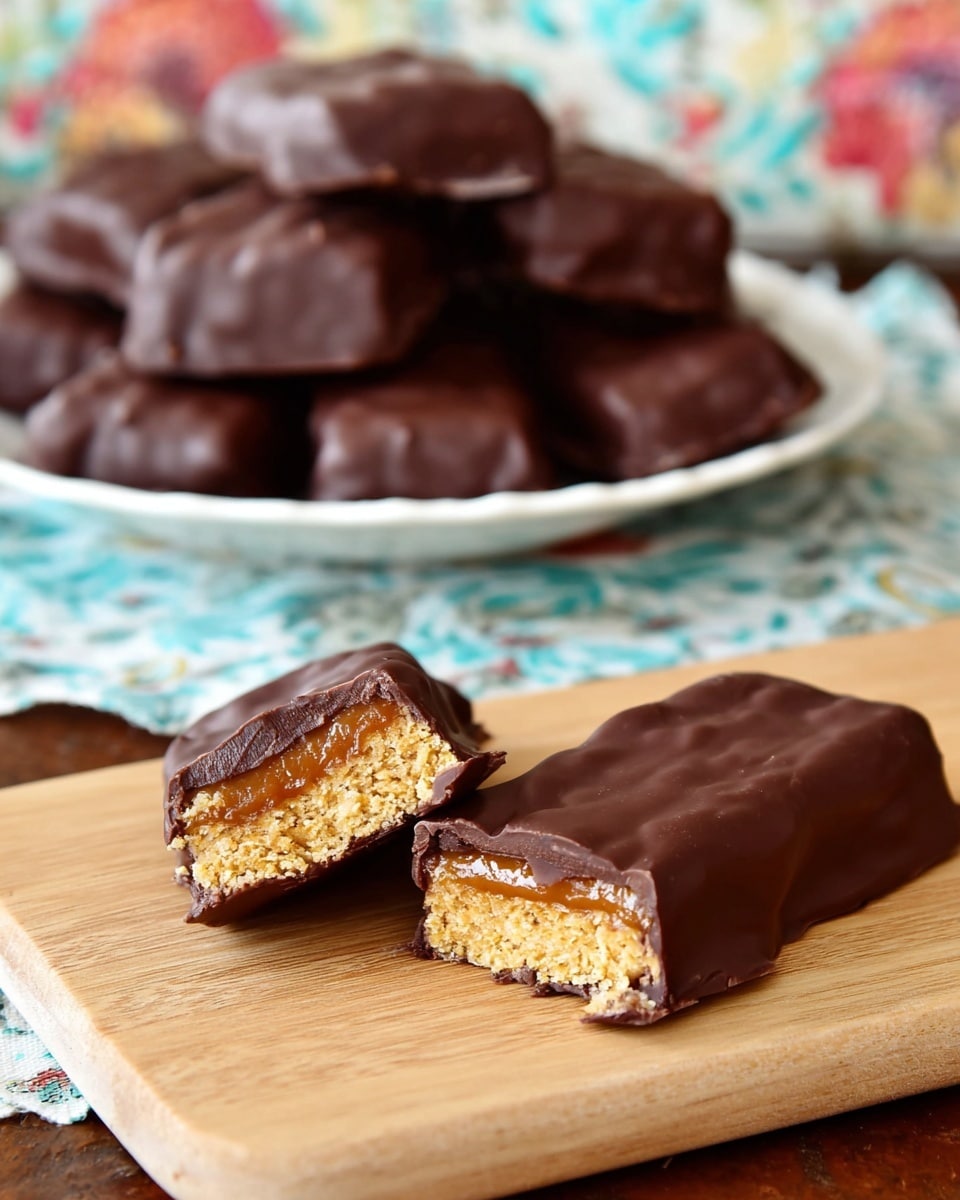
Crispy Homemade Butterfinger Recipe
Introduction
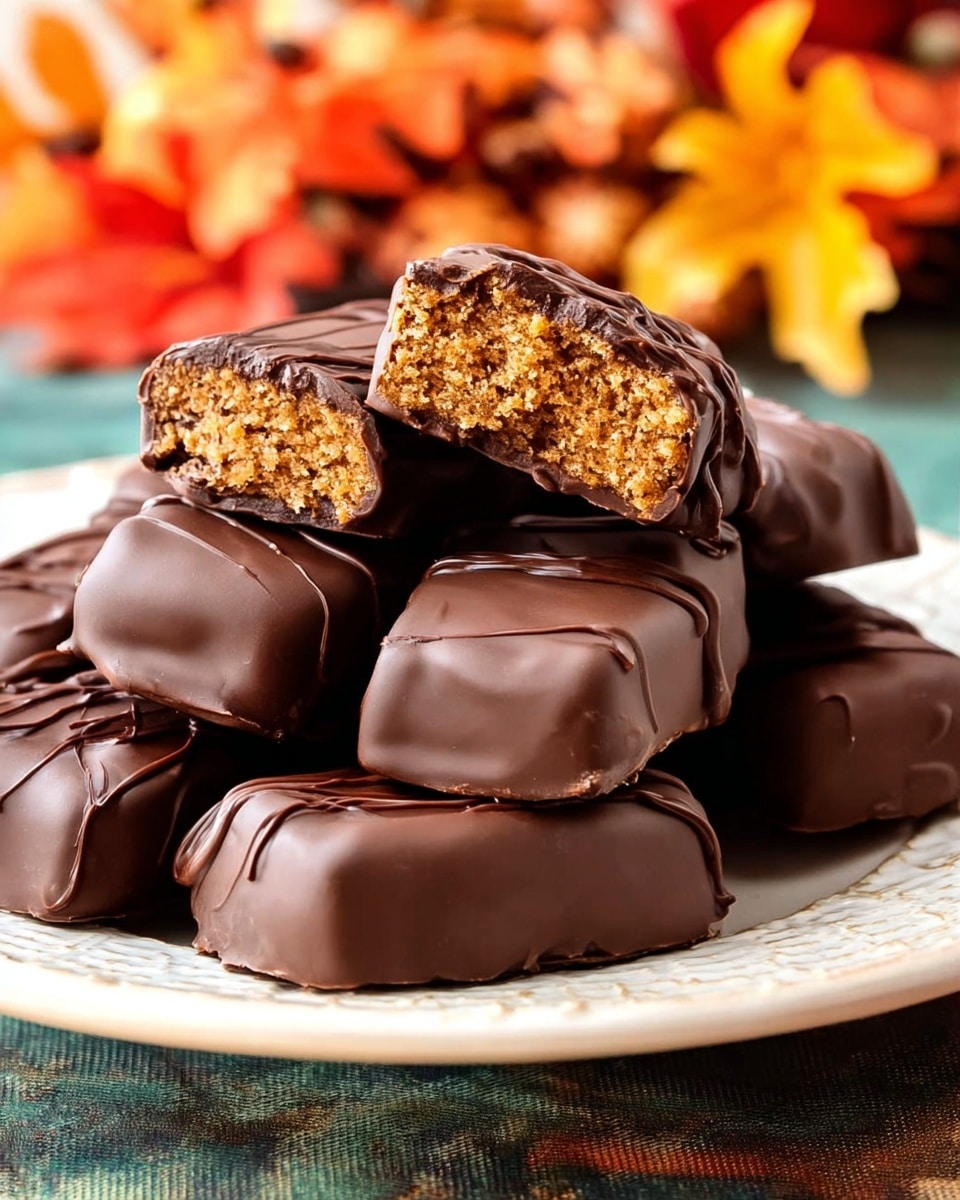
This crispy homemade Butterfinger recipe recreates the classic candy bar with a rich peanut butter center and a smooth chocolate coating. It’s a fun and rewarding treat to make at home, perfect for sharing or savoring on your own.
Ingredients
- 1/2 cup corn flakes cereal (lightly crushed)
- 8 oz peanut butter (I use Smucker’s Natural)
- 2 teaspoons cocoa powder (sifted)
- 2 teaspoons dry milk powder
- 8 oz candy corn
- 2 oz water
- 2 teaspoons molasses (I use Grandma’s)
- 8 oz milk chocolate chips (I use Ghirardelli)
- 8 oz 60% bittersweet chocolate chips (I use Ghirardelli)
- 1.6 oz refined coconut oil
Instructions
- Step 1: Spread the crushed corn flakes out in the center of a half-sheet-sized Silpat and set aside near the stove.
- Step 2: In a small bowl, mix together the peanut butter, sifted cocoa powder, and dry milk powder. Set this mixture aside near the stove as well.
- Step 3: Place the candy corn and water in a medium saucepan and melt over medium-low heat. Smash the candies down with a heat-resistant spatula until smooth.
- Step 4: Increase the heat to medium or medium-high and bring the mixture to a boil. Cook until the temperature reaches 290°F.
- Step 5: Add the molasses, swirl the pan to distribute, and continue cooking until the candy reaches 305°F.
- Step 6: Immediately remove the pan from heat and stir in the peanut butter mixture as completely as possible.
- Step 7: Scrape the candy mixture onto the corn flakes on the Silpat. Fold and press the candy and corn flakes together using the Silpat (and oven glove if needed) to create layers, folding and pressing several times.
- Step 8: After a couple of minutes when the candy firms up, use a rolling pin directly on the candy to roll it out to about 1/4 inch thickness. Fold it in thirds like puff pastry and repeat rolling and folding until firm but still pliable.
- Step 9: Roll the candy one last time to about 1/3 inch thickness. Use a metal pizza cutter or bench knife to score halfway through the candy into squares or bar shapes as you prefer.
- Step 10: Let the candy cool completely, then break apart along the score marks.
- Step 11: To dip in chocolate, melt the milk and bittersweet chocolate chips with the coconut oil in a microwave-safe bowl on medium power in 30-second bursts, stirring until smooth.
- Step 12: Line a half sheet pan or two with Silpat nearby. Brush off any candy crumbs from the centers.
- Step 13: Dip 5-6 candy centers into the melted chocolate using a fork, tap off excess chocolate, and place right-side up on Silpat to cool. This can take a couple of hours.
- Step 14: For extra chocolate, reheat and double dip the candies. Allow to cool again. Optionally, drizzle additional melted chocolate over the top for decoration.
- Step 15: Store the candies uncovered in a dry place to set and cool for several hours or overnight.
- Step 16: Package as you like—cello bags, candy boxes, or a plate. Share or keep them all to yourself!
Tips & Variations
- Use natural peanut butter without added sugar for a cleaner flavor. Adjust sweetness with the molasses if desired.
- Feel free to experiment with different types of chocolate, such as dark or white chocolate, for the coating.
- Keep the candy pliable but not too hard while folding and rolling to ensure easy scoring and cutting.
- Double dipping the candy gives a thicker chocolate shell for a richer taste and better texture.
Storage
Store these Butterfinger candies uncovered in a dry place at room temperature for best crunch, ideally for up to one to two weeks depending on humidity. Avoid refrigeration, which can cause them to lose crispness. If stored in a sealed container, condensation may soften the candy. To re-harden, just let them sit at room temperature until firm again.
How to Serve
Serve this delicious recipe with your favorite sides.
FAQs
Can I use another type of cereal instead of corn flakes?
Corn flakes give a light crunch and mild flavor, but you can try crushed Rice Krispies or similar cereals for a different texture. Avoid overly sweet or flavored cereals which may alter the taste.
Why do I need to use a candy thermometer?
Precise temperature control is key to achieving the proper candy consistency. The thermometer ensures the mixture reaches hard crack stage (around 305°F) so the candy sets with the right crunch and doesn’t become too soft or burnt.
PrintCrispy Homemade Butterfinger Recipe
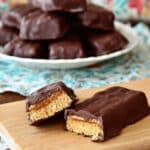
This Crispy Homemade Butterfinger recipe recreates the classic candy bar with a delightful crunch and rich peanut butter and chocolate flavors. Combining crispy corn flakes with a smooth peanut butter center, coated in double layers of milk and bittersweet chocolate, this treat is perfect for candy lovers who want a homemade twist on a nostalgic favorite.
- Prep Time: 20 minutes
- Cook Time: 20 minutes
- Total Time: 40 minutes plus cooling time
- Yield: Approximately 24 – 30 small bars or squares 1x
- Category: Candy
- Method: Stovetop
- Cuisine: American
Ingredients
Centers
- 1/2 cup corn flakes cereal (lightly crushed)
- 8 oz peanut butter (Smucker’s Natural recommended)
- 2 teaspoons cocoa powder (sifted)
- 2 teaspoons dry milk powder
- 8 oz candy corn
- 2 oz water
- 2 teaspoons molasses (Grandma’s recommended)
Chocolate Coating
- 8 oz milk chocolate chips (Ghirardelli recommended)
- 8 oz 60% bittersweet chocolate chips (Ghirardelli recommended)
- 1.6 oz refined coconut oil
Instructions
- Prepare Corn Flakes Base: Spread the lightly crushed corn flakes out in the center of a half-sheet-sized Silpat and set aside near the stove for easy access.
- Mix Peanut Butter Filling: In a small bowl, mix together peanut butter, sifted cocoa powder, and dry milk powder until well combined. Set aside near the stove.
- Melt Candy Corn: In a medium saucepan, combine candy corn and water. Melt over medium-low heat, using a heat-resistant spatula to smash the candies down and stir until the mixture is smooth.
- Boil Candy Mixture: Increase heat to medium/medium-high, bring the mixture to a boil, and continue cooking until it reaches 290°F on a candy thermometer.
- Add Molasses and Cook Further: Stir in molasses by swirling the pan. Continue cooking the candy until it reaches 305°F, the hard crack stage.
- Combine Peanut Butter Mixture: Immediately remove pan from heat and add the peanut butter mixture to the hot candy. Stir quickly and thoroughly to incorporate the ingredients.
- Mix Candy with Corn Flakes: Scrape the peanut butter candy onto the corn flakes spread on the Silpat. Using the Silpat and possibly an oven glove for heat protection, fold the candy together with the corn flakes to create layered texture. Fold and press multiple times with the Silpat to evenly combine.
- Roll and Fold Candy: Once the candy firms up slightly (within a couple of minutes), use a rolling pin to roll it out to about 1/4 inch thickness. Fold it into thirds like puff pastry and continue rolling and folding until the candy is stiff but still pliable enough to score without breaking.
- Final Rolling and Scoring: Roll the candy to approximately 1/3 inch thickness. Use a metal pizza cutter or bench knife to score the candy halfway to three quarters of the way through, creating either small squares or traditional bar shapes.
- Cool and Break Candy: Allow the candy to cool completely, then break along the scored lines into separate pieces to prepare for dipping.
- Melt Chocolate for Dipping: In a microwave-safe bowl, melt the milk chocolate chips, bittersweet chocolate chips, and refined coconut oil on medium power in 30-second bursts, stirring thoroughly between each until chocolate is fully melted and smooth.
- Prepare Dipping Station: Line one or two half-sheet pans with Silpat mats for placing dipped candy pieces.
- Brush off Candy Crumbs: Remove any loose crumbs from the candy centers to ensure smooth chocolate coating.
- Dip Candy Pieces: Using a candy fork or regular fork, dip 5-6 candy pieces at a time into the melted chocolate, flipping to coat completely. Lift each piece and tap against the bowl rim to remove excess chocolate, ensuring the candy is right-side up. Place dipped pieces on the Silpat-lined pan to cool.
- Double Dip (Optional): For extra chocolate coverage, reheat the chocolate and dip the candies a second time. Allow them to cool completely. Optionally, drizzle additional melted chocolate over the tops for a decorative finish.
- Set and Store: Store the dipped Butterfingers uncovered in a dry place to cool and set for several hours or overnight. Ideal locations include inside the microwave or oven if turned off – safe from pets or kids but easy for you to access.
- Package and Serve: Package the candies in cello bags, candy boxes, or simply place them on a plate. Enjoy sharing them or keep them all to yourself – no judgment.
- Enjoy Crispy Candy Bars: These homemade Butterfingers will retain their crunchy texture for at least one to two weeks, depending on ambient humidity, though they usually disappear much sooner!
Notes
- Use a candy thermometer for accurate temperature control when cooking candy mixtures.
- Handle hot candy carefully to avoid burns, especially when mixing in peanut butter.
- Use Silpat mats or parchment paper to prevent sticking during rolling and dipping.
- Refined coconut oil helps create a smooth, glossy chocolate coating by thinning the chocolate slightly.
- Double dipping enhances chocolate coverage but is optional depending on your preference.
- Store candy in a dry, cool place to maintain crispiness; avoid humidity.
- Rolling and folding candy is critical for layering texture similar to commercial Butterfinger bars.
- The candy is firm but pliable during the folding phase; avoid letting it get too hard or it won’t score properly.
Keywords: Butterfinger, homemade candy bar, peanut butter candy, crispy candy, chocolate coated candy, candy corn recipe